Sunday 27 December 2009

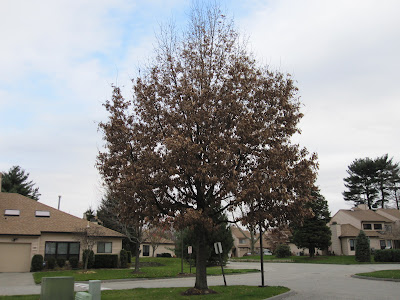
Winter Wildlife Tree

Photo Amy P.

As the holiday season is upon us our thoughts turn to feasting and other indoor activities.
If your a person, who like myself, enjoys the outdoors and wooded areas on a daily basis
stormy winter weather can be particularly frustrating ! Here is a way to fight cabin fever, do a few crafts indoors with friends and family and help wildlife keep warm on those wintry days.
This need not mean making a trip to the craft store if you are handy and have imagination.
A properly adorned Wildlife Tree can attract Blue Jays, Chickadees, Cedar Waxwings, Nuthatch, Woodpeckers and many other seasonal varieties.
While we are all familiar with suet baskets, these can be spruced up by putting rendered suet into onion bags that have been cut into colourful 12inch by 12 inch squares.
You can mix in a few sunflower seeds or other bird seeds as the suet cools to add interest
for the birds. Put the chilled suet in the middle and bring the corners together and tie with cotton butcher cord. Be careful if you use wire or plastic twine as these can damage trees if they are not removed promptly and can injure wildlife if they eat the twine.

Raisin icicles can be made from raisins strung on waxed dental floss. A good sized needle will help to string them and you can store them in a cool dry place until you are ready to place them on your tree.

Frozen cranberries and florist wire can be fashioned into a wreath that will light up your tree and delight wildlife. If you plan ahead you can gather up crab apples and use florist wire to hang them

dumbbell style over branches. If you didn't plan a head you can still cut a few oranges or grapefruits in half and after having a delicious glass of juice fashion these into citrus cups that will brighten up your wildlife tree. After removing the juice and as much pulp as you can punch three holes around the rim of the citrus half and use cotton

or other natural twine to hang the cup from the tree. Store in a cool dry place like the refrigerator for a day or two before filling them with nuts, seeds and other goodies once you hang them on the tree. A small hole near the bottom will keep excess moisture from building up.

These items don't have to be exotic, even a few stems of wheat or barley tied together into a flower cluster, with a small sunflower will attract small birds. Indian corn or whole sunflower heads can be used as well.

Pick a tree away from your house and in view of a convenient window, like the one over the kitchen sink to ensure you will have a good view. You can use a spruce tree or other evergreen to give good contrast and some shelter to birds and squirrels that are munching on your bounty.

Assemble all the ingredients and have a wildlife tree trimming party!I have included a picture of a whild life tree that I came across on the grounds of a local college. A great activity for faculty and staff! This could be a great family tradition that you can start the New Year with.

If you have a tree that your not sure about hanging things off of contact your ISA Certified Arborist to see if its sturdy and safe.

Sunday 15 November 2009

After the Fall


Fall has arrived and the leaves have fallen...or have they!

Trees typically loose their leaves in the fall and signal the changing of seasons. Sometimes the complexities and variability of climate can trick trees into not loosing their leaves. The trees individual circumstances can prevent their leaves from falling as well.

The primary process at work in leaf drop is abscission. The term abscission is from the Latin, Ab meaning away, and sciendere, to cut , “ to cut away”. You needn't wait until fall to see this process in action as it happens all the time in woody plants, every time a flower or piece of fruit falls from a branch.

Fall leaf drop is by far the most spectacular example of abscission at work.

Leaf drop and the formation of the abscission layer, a group of cells at the base of each leaf, is controlled largely by day length and its effects on the production of the plant hormone auxin.

Actively growing leaves produce auxins and they are translocated through the petiole and into the branch that the leaf is attached to. The presence of auxin suppresses the cells forming the abscission layer and prevents them from expanding. As the leaf ages and day length decreases it reaches a point where it no longer produces enough auxin to suppress the growth of the cells and they expand. This expansion closes off the passage from leaf to stem and the leaf is cut away from the stem. This is the complete process of abscission. Sometimes early frosts, or and late summer rains encouraging new growth, resulting in partial leaf drop. This incomplete abscission is unusual but not unheard of.

Typically the leaves eventuality fall off a few weeks later, thwarting our efforts for a timely fall clean up!

The same process allows trees like birches and box elders to loose some of their leaves during times of drought. It is quite normal to see birches loose a noticeable amount of foliage in mid to late summer. Trees that die suddenly due to injury or disease may not lose any of their leaves, this is a diagnostic characteristic of Dutch elm disease.

Evergreens such as spruce and pine do loose there needles continuously through out their lives typically in the early fall of the year.

Most evergreens keep their needles for three seasons. When stressed they may lose many of their second year needles as well.

There are some trees, oaks, beeches and hornbeams, that have developed a different strategy and will retain some of their leaves throughout the winter.This phenomenon is called marcescence. This is very common in younger trees and is there fore considered a juvenile trait, one that some trees grow out of. Marcesesnce may provide some protection from roaming deer and moose that live on buds and trigs through the winter. Buds that are protected from browsing by dead leaves may survive to grow next season. The retained leaves may provide protection from dessication in areas with harsh winter winds.

If have trees that have failed to loose their leaves and are concerned with their health contact your Certified Arborist.


Sunday 11 October 2009

Seasonal Safety in the Woods

Art Work, GF

Fall can be a very scary time in the woods and here are a few tips to keep it from getting even scarier time of year many people are getting ready to welcome people to their woods for a ghoulish night of fright. Indeed many classic horror shots take place in the woods.Now is the time to make sure your haunted fun doesn't turn into a nightmare.
Paths should be kept free from debris and fallen branches to prevent startled trick or treaters from unexpectedly falling when that Wicked Witch flies by. Trees should be inspected for dead limbs or rotten bases that may cause them to fail unexpectedly. If you are attaching props to branches make sure the branch is up to the task. A careful inspection will make sure your ghoul on a rope doesn't unexpectedly come crashing down on someones head. When selecting a branch to hang items from, always make sure the branch is alive and well attached to the tree before you hang your bag of bones from it. Throwing a rope over the branch and giving it a test tug, not while standing under it, is a good way to test for stability.

I always recommend wearing a hard hat and safety glasses while working in your woods. If a tree falls in the forest and no one hears it, it will still make a dent in your head. If you are attaching pulleys to ratchet up a frightful fellow, take the time to properly attach it to the tree. A correctly installed eye bolt and pulley system will last years and can safely raise the faux dead. Never use hardware store gear to climb or lift living people as it is not rated for this use and can fail unexpectedly.

If you are working on a ladder make sure it is sturdily placed or secured to the tree with a rope. Don't over reach and have your ladder come out from under you. A real scary fact is that in accidental falls from above six feet, half are fatal. Be safe keep your feet on the ground. Tree climbing gear is tested and rated for professional use. Contact your Arborist if you have more elaborate set ups that need to be put high in the trees. Removing deadwood before it falls on your deluxe display or has grave consequences is highly recommended.

Another potential safety hazard is electricity. High voltage accessories like strobe lights and projectors can add great punch to your haunted hollow but make sure they don't add unexpected sizzle. Use only fixtures rated for outdoor use and make sure they are connected to properly installed ground fault protected outlets. It is a great plan to contact your electrician and discuss your set up to make sure it is safe and well supplied before you throw the switch.

There are few things scarier than a well placed up light on a mature oak tree.

A walk through your woods with a professional is always a good idea and it may prevent unexpected horrors and trips the the emergency room. If you have questions about the stability of branches or trees contact your Certified Arborist. Have a safe and happy Halloween


Wednesday 30 September 2009

Fall Web Worm


Photo K. Fosty

The fall web worm is a gregarious fellow who likes to get together with friends and eat your prized fruit tree or ornamental. Fall is the time of year when these caterpillars pitch their tents and throw a feast! However, with our climate the French name for these lepodopterans is Chenille à tente estivale, “worm who puts up a tent in the summer time” seems a bit preemptive.

Hyphantria cunea is common all over North America but in it's most northern range, Canada, it only manages to get in one life cycle per year. The insects over winter in pupae attached to fallen leaves and emerge in the spring as adults. The adults mate and then the females lay their eggs on the underside of leaves covering them with silken threads. The eggs hatch and the party begins, munching their way through foliage at an alarming rate. While they eat they excrete silk to create a protective nest. They can often be seen grouped together in their nests early in the morning or on cold days. Typically the host plants for these indiscriminate feeders includes, apple trees, balsam poplars, choke cherries, pin cherries, trembling aspens, white ashes, white birches, white elms, and most willows.

Typically the damage is mostly cosmetic, especially when you consider that the trees have already gotten some energy from the leaves and within a few weeks of lose them. These insects rarely eat all the leaves on a tree and seem to only enrobe a branch or two for their harvest festival.

If you have the stomach for it you can remove the nest by hand or with snippers in the morning and eliminate the problem. They are susceptible to a number of control methods including insecticidal soap or strong stream of water. Check the label on your product of choice or contact a professional to clean up these insects. Cutting out the webs when they are young is the preferred method, and be sure to bag them and dispose off site. A few hours in a black plastic garbage bag in the sun will eliminate any chance of them surviving. Tie the bag tight as they will try to escape and as I found out set up shop in the trunk of your car! If you thing you have this gregarious group dining on your prized specimens contact your Certified Arborist.

Sunday 30 August 2009

Fall Planting Tips


Fall is unfortunately the forgotten season for planting.

Spring, the traditional time to plant, is the busiest, most crowded time to visit your local nursery. Many trees can be planted in the fall and the prices at the nursery can be very reasonable.

I received a call the other day from a valued client who was thinking of replacement plantings for a few trees taken down over the last few years. A quick consultation over the phone started the process to selecting the right trees. We were able to get together at a nursery and chose two trees that suited both the site and his vision of the landscape.

We were also able to avoid trees that would cause problems in the planting locations further down the road. When looking for the right tree it is important to consider the growing conditions at the site. Three major considerations are shade tolerance, drainage and soil conditions. There are many trees that do well in partially shady locations, few that do well in deep shade and many that require full sun to grow and thrive.

Growth habits of the tree are very important when considering the final location. A tree that grows into a large shade tree should not be planted to close to buildings. Trees that produce

flowers are great to use a focal point in the garden during their flowering season. Be sure that the fruit they produce doesn't become a nuisance by dropping onto your patio or deck. Fighting with wasps and flies or constantly washing your fruit stained deck is not a lot of fun.

Some flowering trees produce no fruit and still provide you with great colorful flower displays.

There are trees that retain their fruit and provide wildlife a valuable food source through the winter. Watching winter birds gather fruit and seeds can break up a grey winter day.

Once you have your choices, more are better, go to the nursery and carefully examine their stock .

All trees are not created equal, or at least they don't end up growing that way. Even among cloned cultivars there can be tremendous differences in branch structure as well as cultural artifacts that you may want to avoid. We are not talking about shards of ancient pottery in the growing media, what I am referring to are the various issues that may be present in the nursery that will cause problems later. Trees that have groups of roots spiraling around the base of the tree should be avoided, pot bound trees will fail in future years. While you are looking at the roots look at the base of the main stem, does it have scars or damage from old injuries? This could cause rot at the base of the tree resulting in failure. Following up the trunk look for branches that are co-dominant or have included bark. If you want a tree that has a strong single leader avoid ones that have large branches separating low down on the main stem. Take a close look at the amount of growth present this year and in past years. You can do this by looking at the length of this years growth back to previous years bud scars on the branches. Trees that seem to be growing less each year should be avoided.

Generally younger smaller trees will establish quicker and last longer in the landscape than a larger mature tree. Once you have found a tree that best suits all your needs and have checked it for faults its time to negotiate the price and planting details with the nursery. Selecting good trees right from the start is the best way to ensure great trees in the landscape. If you have more questions about tree selection and planting contact your Certified Arborist.


Thursday 30 July 2009

Soil Gas

Land Fill Without Trees

Soil gas is often the forgotten member of the the soil composition trilogy. While the solid and liquid proportions get all the attention the soil atmosphere is often left literally up in the air.


Soil consists of 3 primary components solids liquids and gases. The solid components take up approximately half of the total soil volume and consist mostly of minerals and a small percentage of roots, plants, and animals referred to as the organic component. The other half of soil consists of even amounts of soil water and soil atmosphere.
While the solids and liquids perform obvious functions like support and nutrient transport, soil gases are more nebulous in their critical relationship to tree growth.
This need for air should be second nature to us all as we share the need for oxygen with our green friends. Without oxygen there is no life and gas exchange is critical to all plants. While
green photosynthetic tissues give off oxygen they also give off carbon dioxide when they burn energy to create chemicals and perform life processes. This process is called respiration and we animals do this part ourselves. Roots and stems do not normally photosynthesize and respire almost exclusively. They need and ample supply of oxygen and good gas exchange to keep everything in order.
Presence of oxygen is the reason that 80% of all tree roots are concentrated in the upper ten inches of the soil.
The arch enemy of soil gas exchange is soil compaction. Soil compaction reduces and can even eliminate small pore spaces in soils. Without soil pore spaces fresh air can not enter the soil and sour gases from decomposition or plant waste processes become toxic to tree roots. Tree roots will often be seen growing at or close to the surface of the soil. More than a futile attempt to anger the lawn mower, this is an indication of compacted soils. Soils that are saturated with water also force tree roots to grow closer to the soils surface. Excess soil moisture can exclude soil gases and eliminate root activity. This is what happens in the classic case of killing with kindness by over watering potted plants. The same thing can happen to trees and shrubs in our landscapes.
The composition of soil atmosphere can have a beneficial or detrimental effect on root activity. Loose porous soils exchange gases like carbon dioxide, created in root respiration and allow for fresh oxygen laden air to reach actively growing roots. Benificial mychorizal fungi benefit from the presence of oxygen and depend on gas exchange to thrive.
When soil moisture levels are high, oxygen levels become low and tree roots die and decay. Roots decaying with out oxygen give off toxic gases like methane that further injure living roots and soil organisms.
In some instances buried or decaying vegetation or construction debris in the sub soil can give off toxic gases that kill roots. Yards that are built on fill or with soil that has been deposited on existing vegetation when grades were drastically altered can slowly decompose. Decomposition gasses are the primary reason that trees are seldom seen growing on old landfills. If you have more questions about soils and soil composition contact your Certified Arborist.

Saturday 20 June 2009

Verticillium


Few tree diseases rival Verticillium for sheer tragic loss. Unfortunately it often appears first thing in spring and the initial indication of its presence is a dead or dying tree. This disease effects a number of tree species but is very commonly the demise of maples. When it comes to maples this disease isn't picky, it can wipe out a prize cut leaf weeping Japanese maple or a weedy box elder without warning. Ash, some linden, buckeye, and russian olive can also fall prey to this potentially fatal disease.

Verticillium dahliae is a soil born fungus that invades the trees vascular system. The disease enters the trees vascular system from the roots and moves upward in the xylem as spores. Toxins produced by the disease and the trees response to the fungus results in wilting symptoms. Very often a tree will be infected with this disease and recover, losing only a branch or two. However later on when when put under stress the tree may be overwhelmed and fail completely. The disease persists in the soil for up to ten years as highly stable fungal structures. Once an area is known to have verticillium it is recommended to plant resistant replacement plants. Generally burr oak, apples, birch trees, walnuts and most conifers are resistant to this disease.

The typical symptoms mimic other vascular fungal diseases like Dutch elm disease, flagging and wilting of leaves and branch die back. In fact the field diagnosis for verticilium is cutting a branch and looking for staining in the sap wood just under the bark. Positive identification in the field should be followed up with a confirmation by a laboratory. In the lab they will put chips of the diseased sample on a petri dish and grow it to confirm the presence of the disease. In elm trees the filed sampling can sometimes result in confusion, but verticillium generally isn't fatal in American elms. Dutch elm disease however is fatal 99% of the time in non resistant elms. Of 100 elm trees sampled and showing staining of the inner bark, less than 2 will have verticillium the remainder will have Dutch elm disease and will be dead by the time the lab results get back to you. I have sampled the same elms several years in a row, with the lab results coming back positive for verticillium consistently. Some of these trees are still standing. In contrast to elms in maples the first sign of verticillium is often slow stunted leafing out in the spring. When this overall infection is present the tree will most likely fail with in weeks and simply dry up and die.

There is a strong correlation with root disturbance and the onset of verticillium infection. It is not recommended to dig tunnel or cut roots near maple trees. Incidence of this disease is low in natural stands. Once a tree has verticillium it is impossible to eliminate it from the tree or soil. Fungicides are ineffective in treating this disease. Maintaining the vigor of the plant is the best plan of action. Fertilizing with a low nitrogen high potassium fertilizer with added beneficial bacteria and root stimulants is of benefit. Generally this should be done as a soil drench and not as a deep root injection. Root injection may result in additional root injury and should be avoided on trees susceptible to verticillium. Trees under moisture stress are more susceptible to verticillium. Wood chips from these trees should be composted and allowed to heat up before using them in landscapes. If you think your tree may have a problem contact your certified arborist.

Thursday 28 May 2009

The Big Dirty


A Novices Guide to Tree Planting

As a young Scout I had the good fortune to plant trees on the east side of Riding Mountain. Many years later while working in the area I was able to locate the area where we had planted and marvel at the forest that was growing in the rough pasture.

The instruction we received was “ stick in your shovel and before you pull it out, put in your seedling”. It was a good thing we were planting trees by the hundred because our success rate was pretty low. If you are planting trees and want to be successful here are a few tips that will increase your odds.

Keep your tree moist,

Never let your trees roots dry out well planting. Roots take up moisture by osmosis, they have no control over evaporation and when left in the sun they will dry out quickly and die.

Dig a big hole.

Always make sure you loosen a large area of soil to allow your tree room to grow. A good hole is wider than deep. The depth depends on your root ball, or root depth if you are planting bare root trees. Your roots should never bend up out of the hole like a “J”. The roots should spread out on the bottom like an upside down “T”

Use the soil you took out of the hole to back fill the the tree

Mixing a little of the soil from the root ball into the back fill encourages the roots to venture beyond the root ball and into the planting site soil.

Make sure the sides of the hole are not glazed.

If you rough up the edges of the planting hole you will have more success and less circling roots. Digging with spade or a power auger can result in a glazed, root resistant planting site.

Never plant your tree too deep.

Make sure the first branch is well above the original soil surface and the first root is at or just slightly above the original soil level. You can lay your shovel across the top of your planting pit to make sure you are above grade. Tree roots seldom grow upwards and planting too deep is often a slow death sentence.

Cover your roots well.

Place the soil around the tree once you plant it and gently push it into place to reduce the amount of air around the roots.

Water your trees after planting.

Watering trees right after planting sorts out the pore spaces in the soil and ensures that the roots will be in contact with soil moisture. This greatly increases the chances of survival.

Ask your Certified Arborist

Arborists are experts in tree selection and tree planting, a quick consultation will help to ensure your success. If you are ever driving on Mountain Road you may catch a glimpse of my “ Trees for Tomorrow !”


Thursday 30 April 2009

Subtle Art


Pruning trees and shrubs is a subtle and evolving art.

While we could spend many pages debating the intricacy of bonsai or the angles of espalier, we should focus on
everyday pruning.

Many times when I have properly pruned a tree a client will comment “it hardly looks pruned”. I always take this as a complement, and will explain the cuts and the rationale behind each one. When I first took my tree pruning license, the rule of thumb was no more than 33% of the crown in any one pruning session. Although it was a while ago that I took my tree pruning exam and I'm sure I wasn't number 007, I did have a license to prune. Fortunately most of the pruning was done by hand and the amount of over pruning was limited by your own strength.
It matters little if you use a bucket truck or climb the tree if you do not have a sound knowledge of the tree and its growth habits and the results of pruning it. Modern equipment increases the potential to do great harm to trees.

The 33% maximum amount pruned has been reduced to 25% and this is stressed as the extreme maximum. On more than one occasion I have suggested that the tree should be removed if you really don't want any of the branches or leaves on it. Truthfully there are some trees that are in the wrong place and may need to be removed. However if you love trees and see the great benefit that they provide, a small amount of pruning will help these giants to live with you.
Returning to the problem of over pruning, if your tree ends up looking like an ancient Greek statue you probably have missed the point when it comes to pruning. The amount to prune is always a concern for the skilled arborist. Many times potential clients will suggest doing radical cuts and extensive pruning that would undoubtedly result in damage or death of the tree. Unfortunately people seem to think that by over pruning they can get better value by avoiding future cuts. I call this the “ pound of flesh “ concept, as in “If I'm gonna spend the money, I want to see a pound of flesh”. This logic would work if you were carving stone or chopping concrete into small rocks. Trees are living dynamic organisms that contribute ascetically to our environments. The living tissue you remove is essential to the tree to create and store energy. Unfortunately the more you prune the more the tree will respond by putting out new and often uncontrolled growth. Any amount of pruning injures the tree and will create a response from the tree, managing these responses is the real art. One should always discuss the reasons for pruning and the expected results at great length with their arborist before you decide to prune. Once you have removed a branch it will never grow back and restoring form may be difficult.
Prune little, prune often is a better strategy in the long run. A few select sell placed and performed cuts will always be better for your pocket book and for your trees.

Sunday 22 March 2009

Sex and the Sycamores


While you may not be able to grow sycamores or ginkos in your garden, some understanding of the complexities of tree gender expression may help to avoid messy problems in your yard.

I used to enjoy visiting a friend's verdant garden in Brentwood. She would walk around pointing out the new trees and shrubs assigning genders more or less randomly. “ That viburnum she's not happy, he's shading her out” and then my hostess would point up to the large box elder that towered over the viburnum. Judging by the seeds on the box elder I knew this wasn't entirely true. When in this situation there is much to be learned by simply listening. After a few visits I discovered that more than assigning genders, my host was personifying the trees as they were literally part of her family.

Trees express gender in a variety of ways. Typically genders are assigned by the presences of male or female flowers. Male flowers produce pollen and female flowers produce seeds. If it were that simple this would be a very short article.

Flowers on trees and shrubs can be male, female or both. In which cases the plant would be better referred to as an “It”. To further complicate matters some species of trees have individuals with only male flowers, clearly “He” trees. The same species will have trees with only female flowers, clearly “ She” trees. This same species will have a small percentage of trees that have male and female flowers on the same individuals, clearly “It” trees. Given that this may account for up to 15% of the individuals of the species it is clearly not a random mutation, rather a part of the overall genetics of the species.

While this may be a surprise, you won't have to go far to find these strange exotic trees.

Ash trees, maples, and yes sycamores all have this type of gender expression. It can be a nuisance and even an major problem if you have a seed bearing tree in an area where the seeds are not welcome. Some trees, like crab apples can be down right dangerous when they are to close to walks or patios. Slipping and falling on decomposing apples can be more painfully than getting stung by a wasp disturbed from its apple sauce dinner. If you have ever had the misfortune of stepping on the ripe fruit of a ginko tree

you will remember the pungent odor. Fortunately plant breeders have used their knowledge of plant anatomy to develop varieties that are based on male cultivars.

This ensures that you have the landscape tree you want without the seeds that may cause trouble. “Baron” maple is a good example of a seedless male cultivar of Box elder.

If you are planning on planting trees this spring, consult your certified arborist they will help insure you get the best tree for your location.


Saturday 7 February 2009

Shrub Pruning 3 Technique


In the first part of this article we discussed the correct timing of pruning on most trees, shrubs and dwarf conifers. The second part of this article was dedicated to choosing the correct tools for pruning small trees and shrubs In this article we will discuss the techniques used in correctly pruning small trees and shrubs.

Terminology for pruning

Before we continue we should have a basic understanding of a few of the terms used to describe the basic anatomy of shrubs. Buds are dormant plant parts. Inside each bud is a complete bud or flower. Buds are described based on their position on the twig. Terminal buds are located at the end of a twig and lateral buds are located below the terminal bud on the sides of the twig. Buds can be arranged opposite each other on the twig or in a zig zag pattern alternating sides along the twig. The location where each bud or group of buds is located is called a node. The piece of twig between the buds is called the internode.

Techniques for pruning

As a general rule pruning cuts should take place just past the node, at a distance equal to the width of the twig. Cutting to close to the node will damage the bud and cause die back. Never cut in the middle of the internode. Cutting in the middle of the internode will result in an unsightly stub that will die back and may be an entry point for disease or insects. Two broad terms for pruning are heading back and thinning out.

Heading back is best described as when you indiscriminately reduce the size of a shrub to conform to a preset size or shape. For instance you may want to prune your carragana hedge into a 4ft by 3ft box. You would accomplish this by using a power shear to cut back the twigs in a uniform fashion. The carragana would quickly sprout a bushy broom on each tip and cover up the unsightly cuts that would result. The problem with heading back shrubs and hedges with this method is that eventually you end up with an umbrella of dense foliage at the tips of each leggy stem and little else below. Formal hedging often requires that you vary your technique by occasionally thinning out the dense canopy by cutting a series of windows in it to allow light and air to penetrate the inside of the plants.


Thinning is a more sustainable method of pruning that involves selectively removing branches back to the appropriate unions with other branches. As you can imagine this isn't done with a power shear. When thinning a hedge you need to determine your over all goal, say thin by 25% or open the hedge up every foot or so. You would then go through the hedge and cut out dead diseased and crossing branches back below the canopy by a foot or so every few feet. You would also remove healty branches back to the appropriate unions in selected locations. You could do this after you sheared it and still keep your formal look with a few small gaps. The hedge will respond by putting out new growth inside and below the existing canopy layer. Over time this method would allow you to reduce the overall size of the hedge without having it end up looking thin or over pruned.

Thinning is the method of choice when you want to maintain a shrub at a certain size and have a more natural form. When pruning shrubs in this style take a tip from your carpenter. Cut once - measure twice. You may notice that a tape measure was not included in my list of tools. You need to step back take a look at the shrub and measure with your eyes. Cut a bit and then step back and view your progress. Before removing larger branches give them a shake and see how they relate to the rest of the plant. Then remove that large branch in stages checking the form of the plant as you go. Once you have made your choice reach into the center of the shrub and cut the branch just slightly above the node of an outward facing bud. This will allow new growth to move away from the center of the shrub and avoid crowding. If you have a hole to fill in the shrub prune back to above a bud that faces the hole. Make a few cuts and then step back and have a look. Eventually you will reach a point that looks good to you then stop. If the shrub is viewed from multiple angles be sure to look at it from all sides. You can make the cuts at an angle if you wish, a clean cut at any angle is best.

Rejuvenation pruning is an extreme form of heading back that can be valuable when dealing with shrubs in mature landscapes. Over time some shrubs will become two leggy and unmanageable. You see this often in older gardens. One radical method of saving old plants is to rejuvenate them. Lilacs are the classic example of this. Lilacs need to have the older branches removed to allow the new growth to flourish. You can do this by removing the older stems back to 6 inch stubs. You leave any new shoots to take over. Typically you would remove 1/3 of the older shoots per year. In three years you will have all new shoots and a much invigorated plant. You will lose some flowers in the first few years and be rewarded with a bounty in the years to come.

A note of caution

Some plants are susceptible to diseases spread by pruning tools. Members of the rose family like cotonea aster and mountain ash should be pruned with sterile techniques to prevent the spread of fire blight. Black knot of cherry is another disease easily spread by unsterilized tools. The solution to this problem is dousing your tools with alcohol between cuts. Cut sterilize, cut sterilize and sterilize between plants.


Sunday 1 February 2009

Pruning Shrubs Part II - Tool Kit


In the first part of this article we discussed the correct timing of pruning on most trees, shrubs and dwarf conifers. To recap that article, generally the best times to prune trees and shrubs are when they are dormant or just after flowering. The best time to prune dwarf pines like mugos, is while they are still candling. In this article we will discuss the

selecting and using the correct tools for pruning.

The old adage “ the right time to prune is when the saw is sharp” probably doesn't tell the whole story but pruning with dull tools is always a disaster.


The bests results come from professional-quality tools that are in good condition.

Most professionals use hand bypass pruners and pole pruners day in and day out. Bypass pruners work like scissors with two sharp blades opposite each other passing each other to making a clean cut. Anvil pruners bring the sharp blade down onto a flat surface, damaging the bark causing die back at the point of pruning.

For cuts up to ½ inch a pair of sharp hand pruners works best. Bypass loppers are over sized hand pruners that will cut branches up to 2 inches in diameter.

Loppers are sized to fit in between hand pruners and pole pruners and often stay on the shelf while the latter two tools do all the work.


A bypass pole pruner will work on overhead branches between ½ an inch and 1 inch. They also can be used for cutting low branches without bending over. For most homeowners 3 small 4 foot poles will be enough for shrub pruning. They are easier to fit in the trunk of your car as well.

Interchangeable saw heads can be attached for tall branches or removed and used as a hand saw to cut branches larger than one inch that won't fit into your pole pruner. Professional pole saw blades are readily available and will fit wooden hand saw handles as well.


Good tools will literally last you a lifetime so take the time to ask questions and get professional grade tools. Contact your certified Arborist for more information on shrub pruning and watch for the third part of this article dealing with pruning techniques.


Sunday 11 January 2009

Shrub Pruing Basics, Part 1, When to Prune


Landscapes make our houses into homes. Trees and shrubs not only contribute pleasant feelings to our surroundings they add up to 15% to the value of your property.

It often takes several years for newly planted shrubs to establish and then before you know it they are on their way to becoming leggy overgrown monsters.

Most shrubs will appreciate even the smallest amount of pruning and reward you with rejuvenated foliage and more abundant buds.

Time to prune

The first key to correctly pruning your shrub is to know what you are growing. Proper identification is essential to correctly prune your shrub. Many shrubs flower on last year's growth and if you are pruning yearly you may never get flowers. The classic example of this is the lilac. Shrubs like these should only be pruned immediately after they bloom to ensure a good set of flower buds for next year.

In contrast to the old wood flowerers some shrubs only bloom on this years new growth. These shrubs should be pruned before the growing season begins.

As with so much of nature there are shrubs that don't fall into either of these categories and flower from both last years growth and this years growth. These typically flower later in the growing season and can be pruned while dormant or right after blooming.


Pruning Chart


Location of Flowers

Best Time to Prune

Typical Plants

Last Years Growth

Right After Flowering

Lilac Forsythia Saskatoon

New Growth

Before Growing Season

Clematis Spirea Hydrangea

New and Old

Right After Flowering or While Dormant

Potentilla Rose

Mock Orange


There are some shrubs that we grow primarily for foliage, like red osier dogwood, elderberry, willows, and barberry. This group should generally be pruned in the winter season before growth begins. Moose prune their dogwoods in the winter and so should you.

Most conifers like spruce, juniper and cedars can be pruned at anytime with the exception of pines. Pines are best pruned in early summer when the new growth is emerging. These long shoots known as candles can be cut or pinched off at the half way point and the shrub will set new buds for future growth. If you prune pines after the shoot has fully elongated and you will be left with a half shoot. Without buds on the end it will loose its needles and leave you with a dead stick.

Contact your certified Arborist for more information on shrub pruning and watch for the second part of this article dealing with tools and techniques.